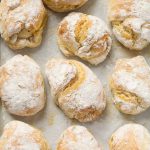
Panini Bread, The Italian Way
This easy panini bread recipe makes crusty, delicious panini rolls that make your kitchen smell like an Italian bakery! It’s a no-knead recipe, an absolute dream when you want fresh bread in about 1 hour. The video recipe and photos are included!
Servings: 10
Calories: 196kcal
Ingredients
- 1 ¾ cup (420 ml) lukewarm water, plus more if needed* (leveled)
- 2 teaspoon Active dry yeast or instant yeast
- ½ teaspoon sugar
- 4 cups (500 grams) unbleached all-purpose flour*, plus more for dusting
- 1 ½ teaspoon fine salt
- 1 Tablespoon (15 ml) olive oil
Instructions
- Mix water, yeast, and sugar in a jug or bowl and let it rest until foamy (about 5 minutes). If using instant yeast, add it directly to the flour; there's no need to mix it with water (follow the manufacturer's directions).
- Combine flour and salt in a large bowl.
- Meanwhile, preheat the oven to 250℉/120℃ and turn it off.
- Add the liquid to the dry ingredients, add olive oil, and mix with a spoon or a spatula to incorporate the flour*. Mix well until no dry flour remains, and add a bit more water if needed.
- Cover the bowl with a damp kitchen towel or cling film, place it in the warm oven, and let it rest for 30-40 minutes*.
- After this proving time, remove the dough from the oven, preheat it to 440℉/220℃, and cover a large baking sheet with parchment paper.
- Gently scrape the edge of the bowl and pour the dough on a floured working surface. The dough is fluffy and a bit bubbly now, and you don't want to deflate it.
- Dust the dough with flour, and using a dough scraper or a large knife, divide it into 10 small pieces, as shown in the pictures above*.
- Gently roll out each portion, dusting hands and surface with flour if needed. Place each piece of dough on the baking sheet.
- Bake for about 20-25 minutes until golden and crusty. They're delicious while they're still warm and freshly baked.
Video
Notes
Spoon & level method: I always recommend using a digital scale to measure the flour correctly. If you don't have one, make sure to spoon the flour into the measuring cup (do not press it), then use the back of a knife to level off the top of the cup. Don’t scoop the flour out of the bag with your measuring cup because you could have more than you need for the recipe. I recommend using a kitchen scale for a more accurate measurement.
Water absorption: The amount of water taken up by flour may vary significantly depending on the flour, brand, and weather conditions. Whole grain or high protein flour, such as bread flour, absorbs more water than all-purpose flour.
When you add water to the flour, start with the amount stated in the recipe. If the liquid is not enough to achieve the dough consistency shown in the pictures above, add a little extra water until the flour has been incorporated. Warm oven method: This trick helps the dough rise faster. Preheat the oven to a low temperature, then turn it off to create a warm environment for the dough to rise. This shortcut works great when you run out of time. Dough cutting: I use a dough scraper, but if you don't have one, use a knife large enough not to require a slicing motion. The dough is fluffy, and you don't want to deflate air pockets. Nutrition facts: The nutritional values are for one serving only. They are based on an online nutrition calculator. It’s an estimate and should not be considered a substitute for a professional nutritionist’s advice. Please see my disclosure policies.
When you add water to the flour, start with the amount stated in the recipe. If the liquid is not enough to achieve the dough consistency shown in the pictures above, add a little extra water until the flour has been incorporated. Warm oven method: This trick helps the dough rise faster. Preheat the oven to a low temperature, then turn it off to create a warm environment for the dough to rise. This shortcut works great when you run out of time. Dough cutting: I use a dough scraper, but if you don't have one, use a knife large enough not to require a slicing motion. The dough is fluffy, and you don't want to deflate air pockets. Nutrition facts: The nutritional values are for one serving only. They are based on an online nutrition calculator. It’s an estimate and should not be considered a substitute for a professional nutritionist’s advice. Please see my disclosure policies.
Nutrition
Calories: 196kcal | Carbohydrates: 39g | Protein: 5g | Fat: 2g | Saturated Fat: 1g | Sodium: 1mg | Potassium: 54mg | Fiber: 1g | Sugar: 1g | Calcium: 8mg | Iron: 2mg